

How to Build Your Own Gaming Table
This blog takes its name from a project I completed a couple of years ago and a suggestion by Duff Wallis. If, like me, you’ve always wanted a good-looking, functional gaming table that takes care of most of your gaming needs, read on. This post is about how to build your own multi-purpose table without paying a king’s ransom or needing more than three power tools.
Creating The Table
Everything worth making is created twice: once in your mind, and then physically in your space. “Recreation” is what this is all about. First stop on the road to a great table: criteria. For me a gaming table had to check all these boxes:
 Seat 2 to 6 people comfortably for a board game or RPG session with enough space to accommodate sprawling games like Eldritch Horror, Space Hulk, and Kemet while still fitting into my games room.
Be at least 3 feet wide by 6½ long to accommodate several playmats end-to-end for games like Star Wars: X-Wing and Wings of War/Wings of Glory.
Have an extension piece to widen the board to a 4 by 6½ foot playing surface for miniatures games like Bolt Action, Frostgrave, 4 player Saga, Chain of Command, and any other medium sized miniatures or skirmish game.
Have a durable playing surface like a poker table that allows cards (and other flicked pieces) to shoot across the table, dice to roll quietly, and be durable and water resistant enough to stand up over time to a spill or two.
Be attractive and come in far cheaper than a store bought gaming table.
Impossible? Nope. Difficult? Maybe. Carefully execute the small and easy steps well and the difficult stuff takes care of itself.
Re-creating the Table
With a roughed out design that met all the criteria it was time to start shopping around for materials to make the design a reality.
Three stores gave me everything I needed to make the table: Home Depot for plywood, spray glue, screws, and staples; Lee Valley Hardware (Ottawa, ON) for table legs and upolstery nails; and Straight Poker Supplies (Toronto, ON) for speed cloth, under-padding, and cup holders.
Speed cloth is what they cover poker tables with. It is cool stuff and fits the bill in terms of being waterproof, durable, slippery, and easy to cut and work with. It also comes in a vast array of patterns and colours. For the cost of postage they were good enough to send me several speed cloth and foam underpadding samples to play with. The bolt in the picture is a 10 foot piece of the Blackberry Speed Cloth. Beautiful stuff.
High density foam is available in several different thicknesses  and a range of stiffness. With samples in hand I tested how well dice rolled and cards slide across the surface of speed cloth over the various kinds of underpadding. I was looking for a dead, noiseless surface for dice rolling with a bit of give so cards would ‘pop up’ when pressed on a corner – Pokerstars style! I went with the denser foam on the right. The sample on the left has much more give which is great for cards but had too much bounce for dice and not enough resistance to have board games stay flat during play.
Automotive upholstery fabric was the final part of the table surface. On poker tables it 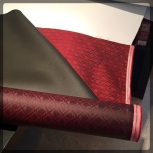 is common to have thick padding under the outer rail so your hands hang down a little onto the card surface. I went for an equally flat surface across the outer rail, which is where your arms rest, and the inner surface of speed cloth where the game is. The black auto fabric in the picture is super easy to work with, really tough, but also a nice surface to touch and rest your arms. I’ve had no regrets at all about the materials chosen for the playing surface. Two years on and all the surfaces are holding up really well even after recently retrofitting cup holders into the outer rail through the auto upholstery fabric.
Building the plywood frame out of good quality, warp resistant 5/8th plywood came next. You’ll see that two tables were built at the same time – a 3 x 6 main table with a smaller pentagon shaped table to seat five – but the method was exactly the same. A drill, circular saw with a fine blade, and a jigsaw did all the cutting and joining. The circular saw did ‘plunge cuts’ and straight work with the jigsaw used to get into the corners. The double layer of plywood gave a solid base with the inner and outer pieces fastened on top once the foam and fabric was applied.


The larger table was built the same way. This time the jigsaw was used to  round out all the corners. You’ll see that originally the cup holders were drawn in but not cut out. That was a mistake. It took some careful work to retrofit them later. This picture also shows a good trick: screw the top and bottom layer together when cutting away the outside material and mark everything clearly and carefully. It’ll save you a lot of guess work and potential mistakes later. To be fair, all the cutting work was done in one day on the only day that January that came anywhere near the freezing point so I wasn’t inclined to spend any more time than necessary outside. But by the time the cutting was done and we were back into the deep freeze I was onto the next step which, mercifully, could be done inside!
Attaching the high density foam underlay is easy. First, fill and sand what will become the table surface. The foam and speed cloth will cover little irregularities but screw holes and divots need filling. Wearing a mask and with vent fans going full tilt I put on a good layer of spray glue then carefully rolled the foam onto the wood. By the way, make sure you use the kind of spray glue that won’t eat foam! Ten minutes later you’re good to cut out the middle from the ring around it with a sharp knife.


Time to make it look pretty by putting on the outer wrap of speed cloth. Even more so than the previous steps this was a two person job. My wife put on a clinic for how to get fabric tight but not too stretched and how to cut fabric so that it covered but didn’t bunch up in the corners. The center insert got the speed cloth and was then laid on the full sized bottom layer and screwed on.


The last step was to cut the auto fabric to wrap around the outer ring. The trick here  is to staple the inner part of the ring while leaving the outer part long enough to wrap both the ring and the solid bottom piece so the outer edge is covered and seamless. I screwed it all together from the bottom, attached the table legs and the project was finished.
I ended up selling the pentagon table as I found it was too small for anything but card games. A poker fan bought it and I ended up breaking even for the whole project, contributing only my labor. Apart from having to add cup holders to the big table it’s worked out really well. With the addition of a detachable extension to bump the width out to 4 feet, we’ve played dozens and dozens of board, card, and miniatures games over the last few years.
The table became what I had imagined in the first place – a gathering place for fellow gamers to meet and take recreation.


Any comments or questions about how to do this project for yourself are welcome. If you’ve got a little technical skill it’s actually pretty simple to do.


That table is amazing! Kudos!
LikeLiked by 1 person
Thanks Luke! It was a fun project and if you break it down into small steps, not that difficult to pull off.
LikeLike
Sean, could you be more specific about which foam you decided on?
LikeLiked by 1 person
Yes, this is the stuff I used 1/4 INCH VOLARA CLOSED CELL FOAM UNDERPAD you can see a link to a store that sells it in Toronto, Canada below. You may not order from them depending where you are but I’m sure you can find it or order it in most specialty poker supply stores if you know what to ask for.
https://www.straightpokersupplies.com/1-4-inch-volara-closed-cell-foam-underpad-foam-108-x-58-piece.html
LikeLike
Thanks for your response. Have you found that dice bounce too much on it? Like bouncing out?
I read that medium density is better than high density because of that. But I don’t have any firsthand experience.
LikeLike
It’s been perfect for me. The covering ‘speed’ or casino table cloth is thin but stiff so that probably tamps down the bounce a little. Nonetheless, you’ll have no problems with too much springiness I think.
LikeLike