Vallejo DAK Airbrush Paint Set
There are two types of people: Those who don’t see anything wrong with paying a premium price for a model that comes unassembled, unpainted, and requires specialized tools and a lot of patience to put together, and those who think such things are lunacy. Those of us in the first camp are always on the lookout for ways to improve the quality of the models we produce. Let’s have a look at Vallejo’s DAK Airbrush Paint Set to see if it’s worth the purchase.
Before getting into a mostly procedural post I’ll do a quick Q&A. Dig through the rest of the post at your leisure.
Are the colours right for painting DAK vehicles? Yes, perfect as compared to original Deutsche Afrika Korps vehicle colours but too dark for scale models. Adding 10% white helps. Dunkelgrau in particular as a base coat gives a muddy look to colours on top. You’ll have to work hard to get  lighter contrasts.
Do Vallejo Surface Primers stick to and cover resin, plastic, and metal? Can’t comment. I used my favourite Tamiya primer. I can tell you the Vallejo surface primers are really, really opaque and have excellent coverage. If the primer stays on over time is another question entirely: one I can’t answer.
Is there value in buying this set of the smaller 8 ml dropper bottles? Absolutely! I did seven 1/56th scale vehicles and can probably do another five. Thinned properly, there’s lots of paint to go around without having to buy five larger 17 ml bottles.
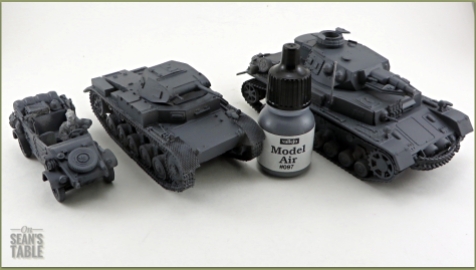
For reference here are the Warlord Games guinea pigs that were subject to a lot of trial and error. The take away here is that I ended up with two types of resin, two types of hard plastic, metal, putty, and superglue that needed a uniform primer coat.
Due diligence. I gave everything a good scrub with warm soapy water and let everything thoroughly air dry. I was ready to give the Vallejo Surface primers included in the DAK set a try but got cold feet and went for the tried and tested Tamiya Surface Primer as a base layer. I was painting seven vehicles at the same time and not prepared to invest that much time and effort only to have the base coat (and everything on top!) peel off later. I’m just not convinced that an acrylic primer can match what Tamiya spray has done for years, perfectly every time, and am not inclined to take the risk to find out.
I’d love to see evidence I’m wrong, until then…
 I played around with some black pre-shading to range in on how much, if any, thinner is needed with Vallejo Model Air paints. There was some less than smooth black overspray until I arrived at a 10:2:1 ratio of paint to thinner to Airbrush Flow Improver. That seemed to be the magic mixture and served me well throughout the rest of the painting process. I’ll go with that from now on. The Flow Improver works wonders to keep your airbrush tip unclogged even during long spray sessions and kept my paint flowing smoothly. I’d say it’s mandatory if you’re doing longer airbrushing sessions.

Most of the colours provided are matched to the original RAL which are the official German WWII colour codes so they are as accurate as we can get. (Geek out about official paint codes here.) You’re going to need some judgement in figuring out how to counter the tendency for models to appear darker than the original full-scale vehicle with exactly the same paint colour applied. To be clear, this paint set does not adjust for ‘scale darkening’ for you but in most cases this is simply a matter of adding 10% white to your colour to offset the ‘scale darkening’ effect. Those with a firmer background in colour theory will know how to do this more accurately. If you want to go down the rabbit hole go ahead and Google “shade Vs. hue Vs. saturation”. See you in a few hours…
Welcome back! Above, you can see the Dunkelgrau Surface Primer is so dark and opaque that you can’t see any of the previous white or black pre-shading through it. If I had it to do again I’d prime white, then use the dark grey primer as a pre-shade, then lightly spray with Base Grey, the next colour in the recommended DAK set sequence. I used the next layer, Gelbraun, mixed with some white to get some shading going again. Be forewarned, any colour over this dark grey is going to come out muddy looking.
I worked my way through the paint set making sure to leave a lot of the previous layers showing through between coats. Because I was trying to counter the super dark base coat, was going to do a ton of weathering that would darken things, and I like a lot of contrast on my models I added a final light highlight of Vallejo Model Air Beige. I tried using the supplied Matt Varnish through my airbrush and got nothing but a clogged nozzle and goop on my model. I think 50/50 varnish to thinner might work but, again, I just fell back on what I know. I quickly washed the goop off and airbrushed my tried and true topcoat, Future Floor Polish. Perfect as usual! The paint was sealed and the decals went on perfectly.
So, would I buy this paint set again? Yes, definitely. I really don’t need large bottles of the paint and this was a quick and easy way to get all the right colours in smaller amounts. The paint goes a long way. I figure I’ll get a total of twelve 1/56th scale models out of the set which is enough to do my entire Bolt Action/Chain of Command army. Now that I’ve got a better handle on Model Air paints I will buy more of Vallejo’s paint sets in the future for specific colour schemes.


Pingback: Blitzkrieg Miniatures DAK Vehicle Review | On Sean's Table
Pingback: Publication in Wargames, Soldiers, & Strategy Magazine, #94 | On Sean's Table
Pingback: Desert Terrain: Palm Trees Tutorial | On Sean's Table
Pingback: Desert Terrain: Village Well Tutorial | On Sean's Table
Pingback: Battlegames Guest Post: Bricking It | On Sean's Table
Pingback: Masking camo on a PSC 15mm StuG | On Sean's Table